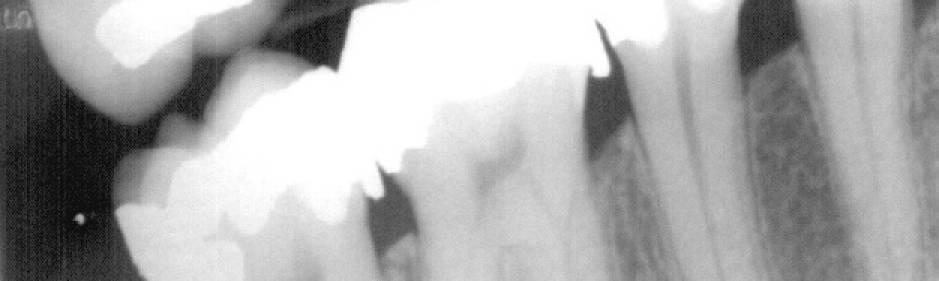
Scanning X-Ray Films
Using the XSane Software
This project uses the XSane scanner control software. First, let's get the obvious question out of the way: Why the silly name, or what does the silly name mean?
TWAIN is a standard software interface used for communication between software applications and imaging devices such as digital cameras and scanners. The TWAIN project dates from 1992 when several companies from the imaging industry attempted to standardize the communication protocols. Standard protocols are a good thing — hardware and software can be counted on to work together. The name TWAIN isn't an acronym, they just prefer to spell it all upper case. It's a reference to the opening line of Kipling's poem "The Battle of East and West", "Oh, East is East, and West is West, and never the twain shall meet", and the difficulty at the time of connecting imaging hardware and computers.
Then a later software project took the name SANE, an acronym for Scanner Access Now Easy. Yes, it's meant to reference the name TWAIN, although it uses a rather different programming model.
SANE is just the application programming interface, a collection of tools and software libraries that allow developers to write powerful software, but it isn't really a user application itself. The XSane project has built a nice graphical user interface, based on SANE and originally using the X graphical environment used on pretty much everything that isn't Windows. And if you want to know why "X" is the name of the graphical environment, you'll have to ask the people at MIT who invented X and made it open source and very popular.
This background doesn't really matter here, beyond calming any worries about XSane being a bizarre name. If you really want to know the background, go see the web sites for the SANE, XSane, and X projects.
If you don't yet have XSane installed on your system, do so now. There are pre-built binaries available for various types of Unix (Linux, BSD, etc) and even Windows. For MacOS X it seems to be available here. See my page on package management to see how to add it to Linux or any other version of Unix.
XSane Main Control Window
We need to look at the main control window for XSane. This is where you do everything except direct the scanner to make a preview scan and select the area to be scanned.
But first, what if you start XSane and it immediately reports an error about no scanning device being available, and then exits? That means that you don't have a scanning device attached! Make sure that your scanner's USB cable is attached, and make sure that the scanner has power. Many scanners, like the HP ScanJet 2200c, have no power button and no power indicator. There's no indication that it has power, just see if XSane finds it.
You could see if the scanner is detected as a connected USB device. On Linux:
% lsusb
Bus 001 Device 001: ID 1d6b:0002 Linux Foundation 2.0 root hub
Bus 001 Device 004: ID 05e3:0760 Genesys Logic, Inc. USB 2.0 Card Reader/Writer
Bus 002 Device 001: ID 1d6b:0001 Linux Foundation 1.1 root hub
Bus 002 Device 002: ID 046d:c404 Logitech, Inc. TrackMan Wheel
Bus 002 Device 004: ID 03f0:0605 Hewlett-Packard ScanJet 2200c
Bus 003 Device 001: ID 1d6b:0001 Linux Foundation 1.1 root hub
Bus 003 Device 002: ID 051d:0002 American Power Conversion Uninterruptible Power Supply
Bus 003 Device 003: ID 045e:00db Microsoft Corp. Natural Ergonomic Keyboard 4000 V1.0
Bus 004 Device 001: ID 1d6b:0001 Linux Foundation 1.1 root hub
Or, on BSD Unix, on a laptop with just the scanner and a camera plugged in:
% usbdevs
addr 1: EHCI root hub, SiS
 addr 2: USB PTP Camera, Fuji Photo Film
addr 1: OHCI root hub, SiS
addr 1: OHCI root hub, SiS
 addr 2: HP ScanJet 2200C, Hewlett-Packard
But, the simplest thing is to simply verify that the scanner is powered up and the USB cable is connected.
We need to look at the main control window for XSane. We need to go through the functions of many of the controls in this window.
XSane main control window.
Menus
In the menus at the top of the main window, these are the important things to know or to check:
File — This leads you to the exit from XSane.
Preferences —
Select Setup from that menu,
and a new window will appear.
Click on these tabs and check and fix the settings:
Save —
You probably want both Overwrite warning
and Skip existing filenames
selected (have check marks),
and a Filename counter length
of 3 would be appropriate (click on the
number for a menu of choices).
Filetype —
Increase the JPEG image quality to 95.
Enhancement —
Make sure that both "Autoenhance gamma"
and "Autocorrect colors" are selected
(have check marks),
and "Preselect scan area" is not
selected (does not have a check mark).
That's all the settings that are really critical
for this project.
Click the OK button to get out of the setup.
This changes a configuration file stored in your
home directory, so you only have to make these changes
once.
XSane will read those settings the next time you
start it.
View — Make sure that Show tooltips is selected. If not, click on it, then bring the View menu back up to make sure it has a check mark. If you care about the units displayed at the bottom of the main window, metric versus imperial, choose that under Length unit.
Windows — If any of the other windows go missing, it's because they are de-selected here! The only other window you really need is the preview window. It's the other window with the big XSane logo in it right now. If it isn't on your screen, make sure it's selected.
Saving Full Greyscale Range JPEG Images
We just made sure that "tool tips" were turned on. If you hover the mouse over an item (move the pointer so it points to the item, then don't click but leave the mouse motionless), a reminder will appear.
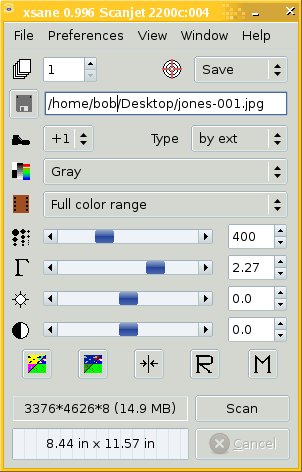
At right is another copy of that main window. Let's go through the controls on the top half. I will name most of the controls for how they appear in their tool tips, but generally this goes left to right down the rows:
XSane main control window.
Number of pages to scan (currently "1" on my example) — This should be set to 1.
Target (next to the bulls-eye pattern) — This should be set to Save.
Filename for saved image
—
This is where a little thought can make things
easier for you.
Look at the example I have set:
/home/bob/Desktop/jones-001.jpg
That means that the saved file will appear on my
desktop, and it will be named jones-001.jpg.
I did this because I am scanning some films for
a patient named Jones.
The first file I save will be named jones-001.jpg,
and then XSane will automatically add 1 to that
number.
If I simply change films and make another scan,
that file will be named jones-002.jpg.
Let's say I scan a third set of films for this patient,
so that will be
jones-003.jpg.
Now let's say that I'm done with patient Jones,
and I'm ready to scan the films for patient Smith.
All I need to do is change jones to
smith in that file name, and continue.
It is very important
that you remember to change the
part corresponding to the patient name.
You do not need to bother changing the number back
from 004, which it will now say, to
001.
You can, it's your choice.
Let's say you left the number alone.
You scanned three for Jones and now you scan two
for Smith.
All file files will be saved on your desktop,
and the files will be:
jones-001.jpg
jones-002.jpg
jones-003.jpg
smith-004.jpg
smith-005.jpg
Now you can easily create a folder for each patient,
sort the images into those folders,
and burn one CD for each patient.
Or, with K3b, simply select files off the desktop
based on their name and create the CDs without
making folders.
The next time you start XSane, you will find that
it is ready to save the image to a file named
smith-006.jpg.
It is very important that you verify the file name
every time you start XSane,
and every time you move to films for
a new patient.
Value that is added to file counter after scan
(currently +1 on my example) —
This should be +1.
It's the number added to the end of the file name
after each scan.
It is very important that you leave some
dash-three-digits extension to the file
name when you make changes.
In other words, change it from jones-004.jpg
to smith-004.jpg
and not to smith.jpg!
Type of image format
—
This should be by ext, and so
it is very important that the file name always
end .jpg or .jpeg.
Selects the scan mode — This should be Gray.
Select source medium type — This should be Full color range.
As for that source medium, you may notice that there are choices for slides and for a variety of negatives. I have read that those are pre-defined adjustments to the brightness and color sensitivity curves, and you can create your own and add it to the choices by specifying the correction curves in a personal configuration file.
I could have solved the problem of adjusting the scanner sensitivity for backlit X-ray films that way, but I found a way of accomplishing this that is easier for me to describe and for you to do.
Let's finish examining the XSane control interface. Here's that same window again:
XSane main control window.
Image Quality and Characteristics
Set scan resolution (dots of different sizes) — This should be 400 for the intraoral 40x30 mm films, and 200 for the panoramic 280x125 mm films.
Set gamma value (Greek letter Γ) — Gamma correction is a very important remapping of brightness values. The gamma value of 2.27 you see in my example seems rather high, but when we get to finally scanning some films we will see why. It's usually spelled "gamma" but sometimes you see the Greek letter Γ as here, or the lower-case γ. See the excellent Wikipedia description for details on what gamma correction is and why it is so important.
Set brightness (looks like a sun burst) — This will be set to 0.0 by one of the steps in our scanning procedure.
Set contrast (half-white half-black circle) — This will be set to 0.0 by one of the steps in our scanning procedure.
Negative (left-most of five square buttons) — You do not want to select this. Try clicking on it, you will see the effect in the preview window, and you will notice that the button is darkened, to look as if it is pushed in. Click it again to turn it off.
Autoadjust gamma, brightness, and contrast (second of five square buttons) — This button will be very important in our scanning procedure!
Set default enhancement values (third of five square buttons) — This resets gamma, contrast, and brightness to 0.0.
Restore enhancement values (fourth button, with "R") — You don't want to use this! We must set the enhancement values manually for each set of films.
Store active enhancement values (fifth button, with "M") — You don't want to use this! We must set the enhancement values manually for each set of films.
Scan — After you have done a preview scan, and selected the scan area, and adjusted the gamma, all as described on the next page, you will click the button to run the scan.
Cancel — This button is currently greyed out, it only becomes active during a scan. You would use this to cancel a scan you didn't want to perform instead of waiting for it to finish on its own. There would be no harm in letting it go ahead and do that scan, you would just have an irrelevant image and a little wasted time.
The Preview Window
Below is the other important window, the preview window, as it appears when you first start XSane. We have already set it to greyscale mode, so you see the XSane logo without the colors.
So, I'll set up the scan. I'll place a 4-film sleeve on the glass and then block off the rest of the glass with opaque material.
Next, I'll click the Acqure preview button.
The Cancel preview button would be active during the preview, I could use it to quickly end a preview I realized wasn't going to work.
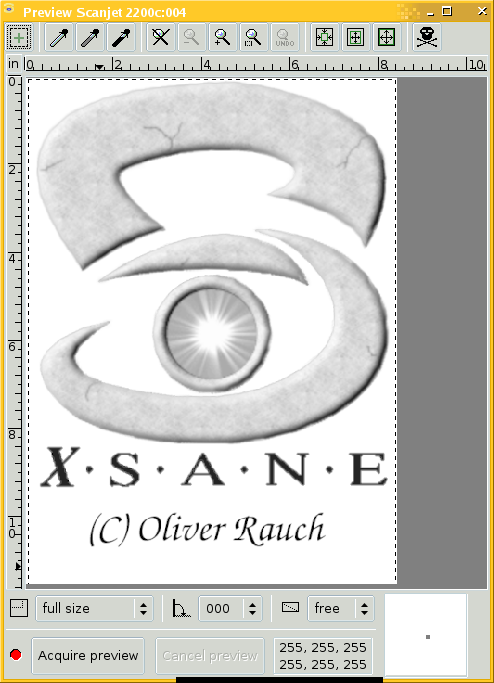
The preview window when you have just started XSane in greyscale mode.
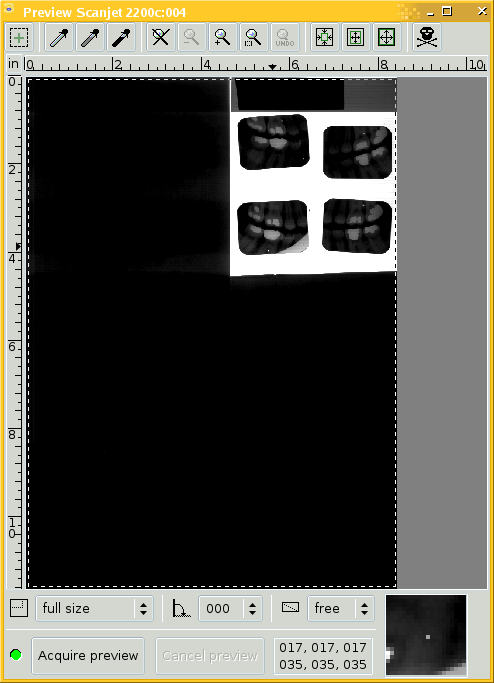
A preview scan of one 4-film sleeve.
Here is the result of that preview scan. A little light has leaked under some of the opaque blocking material, but not very much.
See those dotted white lines? They define the area that will be scanned. We want full control over that, so we de-selected automatic adjustment of the scanning area in an earlier step. Right now XSane is ready to scan the entire area, although most of it is blocked off.
Click and drag the dotted boundaries, by their sides or corners. Limit the scan area to just what you need to capture.
Remember that we are scanning at 400 ppi, and so a 4-film sleeve about 9.5 by 11 centimeters in size, or about 3.75 by 4.4 inches, will result in an image with dimensions of 1500 by 1760 pixels, far larger than what fits on a typical display!
That's fine. We want to capture good data. Whoever receives the images can decide what they want to do with them.
At the same time, don't crop out areas that you want! We are making an archival copy, presumably this is our last chance to capture the data.
You may have noticed that I selected the paper or plastic tab at the top of the sleeve. This is a real patient's sleeve and I have covered all the written information with completely opaque electrical tape. However, for most of the sleeves I have experimented with, the written information can be captured in these scans! That is good news for helping to organize the images, and letting you double-check one last time that you are giving patient Jones the scans for patient Jones, and not those of patient Smith!
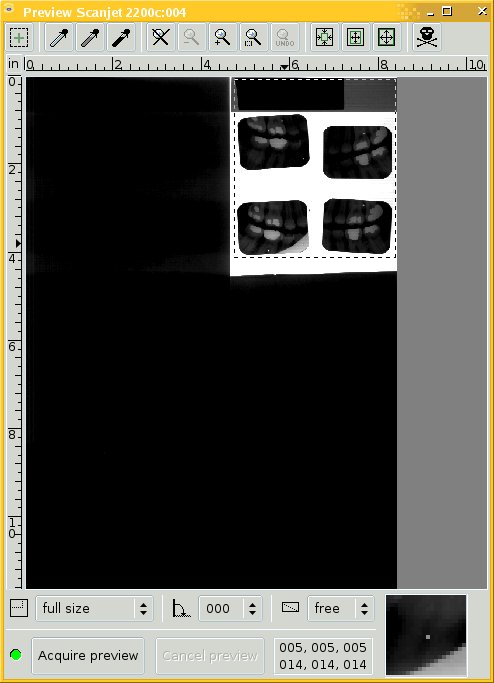
The preview scan has been cropped.
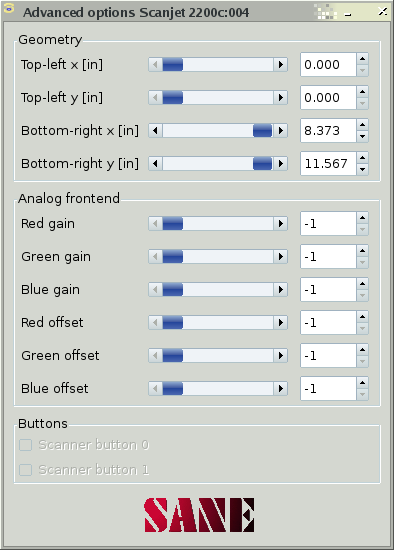
The advanced options — leave these alone.
You may see extra features in the Advanced options window. See the Analog front end settings available in the example above. Will you see these? It depends on the type of flatbed scanner you use. If they are supported by that scanner, as they are by the HP ScanJet 2200c, they will appear.
However, I found that these aren't really helpful. Yes, you can adjust the gain and DC offset of the three color channel amplifiers here. But those amplifiers get very noisy with higher gain. Leave those at -1 or 0 or whatever their default settings are. We will handle the brightness issue with gamma correction.
Just ignore this panel if you see it!
Now you're finally ready to Put it all together and scan some films!