How to Fabricate Printed Circuit Boards Using Laser Printer Toner Transfer
Fabricating Printed Circuit Boards with a Laser Printer
Start by creating a reversed image of the desired pattern. That is, it should be a "through-board" view, how it would appear if you could look through the board and see the pattern on the far side.
Put simply, if there is to be any lettering on the or numbers on the trace side of the board, that writing should be reversed left to right.
If you are duplicating an existing board, scan that
board in.
Adjust the contrast and thresholding to get the pattern
you want.
Remember that you want black where copper is to remain,
and white where copper is to be removed.
Then flip that image left to right.
That's easy with
ImageMagick,
where -flip reverses an image vertically
and -flop reverses it horizontally:
$ convert -flop original.jpeg new.jpeg
Print that image onto JetPrint Photo Glossy Multi-Project paper using a laser printer. Note that this type of paper is intended for ink-jet printers if you are printing photographs, but we need to use a laser printer. We are intentionally mis-matching the printer and paper. The printing will be onto the glossy surface of the paper. Be careful to correctly orient the paper in your printer's feed tray.
The paper is widely available at office supply stores, discount retailers like Walmart, and from Amazon.
Amazon
ASIN: B00001RMDS
Note that some people use glossy magazine pages for toner transfer, as described at the Steampunk Workshop.
Because of the way a laser printer works, the fusing process will have heated the plastic toner powder to temperatures up to 200° C and pressure bonded the result to the paper.
Because of the characteristics of the glossy photographic paper, this is a really inappropriate method for printing documents you want to keep around. Our goal, however, is a plastic based pattern that is not well bonded to the paper, so we can transfer it to the copper clad circuit board!
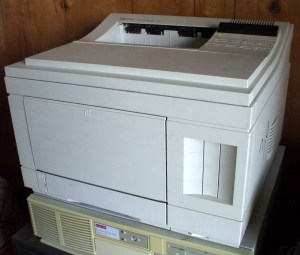
A sturdy old HP LaserJet 4 printer.
Thoroughly clean the copper cladding on the circuit board. Soap and water with 3M Scotch-Brite pads produces a nice finish. Be careful to only hold the board by the edges, as you need to keep skin oil off the board until the pattern has been transferred. A final wipe down with acetone (which you will already have on hand for a later step) can ensure that all skin oil is removed.
Amazon
ASIN: B000LPN3WQ
Transfer the toner pattern onto the copper surface using an iron. The iron should be set at its highest temperature setting, usually "cotton". Place the pattern sheet toner side down on the copper. Then place a sheet of plain paper on top of that. Press firmly with the iron, but be careful not to move the pattern once you start. Also carefully avoid using so much pressure that the toner flows, possibly creating shorts between closely spaced traces.
Heat the board for about one minute. Our goal is to re-melt the toner so it bonds onto the copper.
Allow the board to cool for at least 30 to 60 seconds. This allows the toner to re-harden, now bonded firmly to the copper and loosely to the paper.
Rinse the ironed paper and board under running warm water. Very warm, but not so hot that you can't keep your hand in it. The goal is to heat the paper's plastic surface, but without being so hot as to weaken the toner's bond to the copper.
Slowly and carefully peel the paper from the surface, keeping the water flowing on the paper-toner interface. The warm water will help separate the toner from the plastic paper surface. Be careful that you are peeling the paper off and leaving the toner bonded to the copper.
Etch the board to remove the exposed copper.
Are you still using ferric chloride as an etching solution? Here's a better etchant that can be re-used without the environmental disposal problems of ferric chloride:
Start by getting both hydrochloric acid and hydrogen peroxide.
Hydrochloric acid is commonly available at home-improvement stores, as it has a number of construction uses. It is usually sold under the archaic name of "muriatic acid".
Amazon
ASIN: B000KKQ8LA
Amazon
ASIN: B07J6SRND8
Moving to a well-ventilated area, prepare a sturdy non-metallic container for the etching bath. A deep glass tray from a thrift shop would be useful. But do keep in mind that you will need to pour the etching solution back out of this container, pouring it through a funnel into a storage container. Wide and shallow glass pans will be extremely difficult to use safely.
Using a non-metallic measuring cup or glass, place two measures of hydrogen peroxide in your etching container first, and then follow that with one measure of hydrochloric acid. "Do as you oughta, add acid to water", and hopefully you'll avoid a runaway exothermic reaction. Assuming that your hydrochloric acid was 10 molar, you now have an etching solution that is about 3 molar HCl with a moderately strong oxidizer.
Do be very careful with this! The etchant is very reactive, especially when you first start it.
The first board may etch in just a couple of minutes. Stir the etchant with a sturdy or disposable non-metallic object.
Etch your board. Be careful to not leave it in the etching solution too long, especially on the first use of a batch.
Remove the board and rinse it well. Use something basic (for example, ammonia based glass cleaner) to neutralize any acid remaining on the board.
Transfer the used etchant into a sturdy acid resistant storage container. It can be re-used over and over again!
The first time you use a fresh batch of etchant, it will produce a small amount of chlorine gas. However, as you use and re-use the etchant, the copper dissolved from previous boards forms cupric chloride, which will do most of the etching. The initial reaction is:
Cu + 2 HCl + H2O2 → CuCl2 + 2 H2O
The produced cupric chloride, CuCl2, is responsible for the green color. It also does most of the etching in the future:
Cu + 2 CuCl2 → 2 CuCl
Once you've etched enough to convert all the cupric chloride, the solution turns from green to brown. You can now add oxygen in the form of a small amount of added hydrogen peroxide and get back to etching:
2 CuCl + 2 HCl + O → 2 CuCl2 + H2O
If the solution doesn't turn from brown back to green, then you need to add a small amount of hydrochloric acid.
For more on the chemistry, see this Instructables page. And for far more on the chemistry, see "Etching with Air Regenerated Acid Cupric Chloride". The original page has some permission error, so see this archived copy.
Getting back to our project, use acetone to dissolve the toner layer and clean the board. A brass brush may come in very handy. Be careful about using a plastic bristled brush with acetone, as you might melt the brush onto the newly etched board and make things far worse instead of better!
Alternative: Custom Printed Circuit Boards
The August 2019 issue of QST magazine had two articles of interest. Pages 30-35 had "Recreate or Modify PCB Layouts with Open-Source Software", by Erich Heinzle, VK5HSE. It describes using GIMP, the GNU Image Manipulation Program, for modifying images; pcb-rnd, for editing circuit board design; and gerbv, a Gerber file viewer. It has step-by-step instructions for scanning a board design, modifying it, and viewing and saving the results.
The second article was a review of PCBgogo prototype printed circuit boards. The review describes getting "up to 10 PC boards of the same design, measuring 100×100 millimeters, for $5 total. For $21, they can ship finished boards by DHL air, typically with a 1-week turnaround." The web site shows that's a two-layer board, top and bottom, with vias.