YubiKey Authentication With pam_yubico.so
YubiKey and Challenge-Response Authentication with pam_yubico.so
Download Oracle Linux
Two-factor authentication
or, more generally,
multi-factor authentication,
2FA or MFA,
is required in sensitive environments.
For example, if you must be compliant to the
U.S. Department of Defense
STIG
or Security Technology Implementation Guide.
YubiKey devices provide multiple ways to authenticate a user.
The next question is,
which of those are supported by my operating system?
Red Hat Enterprise Linux used to include the
pam_pkcs11.so
PAM module.
With RHEL 7 that was a way to do MFA on Linux.
However, that package was dropped with the RHEL 8 major release.
Debian Linux includes both
pam_pkcs11.so
and
pam_u2f.so,
but Debian isn't controlled by a U.S. company so
the Department of Defense, or actually its
Defense Information Systems Agency or DISA,
won't even consider creating a
STIG for Debian.
However, the EPEL collection,
Extra Packages for Enterprise Linux,
has packages you can install on RHEL
and compatable derivatives including
Oracle Linux and Fedora Linux.
EPEL includes a pam_yubico package
that includes the pam_yubico.so
PAM module.
Let's see how to set up multifactor authentication
with a YubiKey on Oracle and Red Hat Enterprise Linux.
Selecting the YubiKey Device
I had set up multifactor authentication
using a version 4 YubiKey and pam_pkcs11.so
on RHEL 7.
Now a few years had passed and I needed to do that on RHEL 8.
I knew that the YubiKey 4 had been outdated when I did this the first time. But I had forgotten the details.
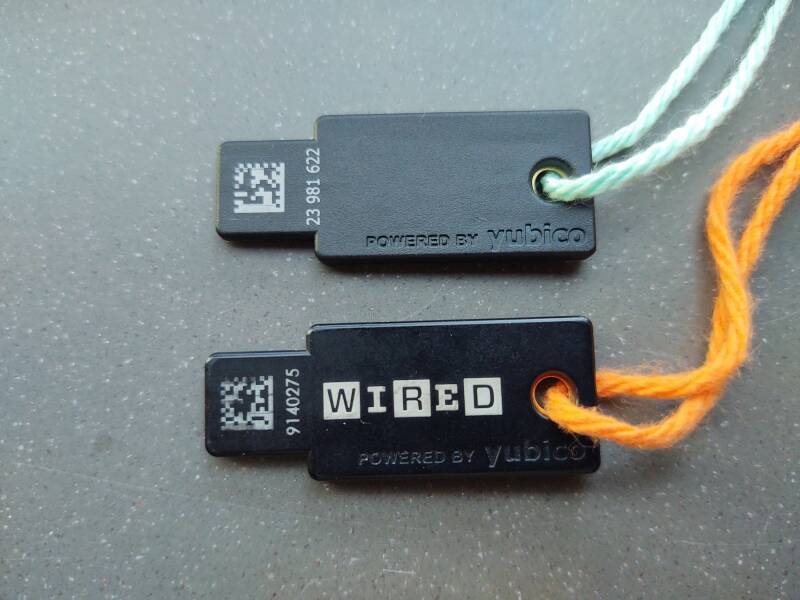
The YubiKey 4 had been close to its End-Of-Life when I had started the earlier version of this in 2019. That was just a few months before Yubico quit selling them. I was a sub-sub-contractor, and the sub-contractor had sent me a YubiKey 4 that someone had received as a free gift with a Wired magazine subscription. The free YubiKey 4 is pretty obviously the lower one in this picture:
Amazon B0BVNPWPCN
The prime contractor and the end customer apparently had plenty of somewhat old YubiKey 4 devices lying around at the time, so that had worked out. Now, however, you couldn't even get YubiKey 4 devices as giveaways with magazine subscriptions. You could get them used through Ebay, but... Besides, the YubiKey 4 supported a relatively limited cipher suite.
Cryptography evolves, it has to. When you select an algorithm, it is defined for all times. AES or the Advanced Encryption Standard uses the Rijndael block cipher published by two Belgian cryptographers in 1991. Cryptographers have come up with new ways to use it, such as the stream-like modes like CCM used with 802.11 and GCM or Galois/Counter Mode used with TLS. But the core of those is the same Rijndael block cipher submitted to NIST's AES competition in 1991.
Cryptanalysts devise new attacks and observe new logical problems with the operational modes. AES-CBC, AES running in Cipher Block Chaining Mode, used to be all the rage in TLS connections used to protect web traffic and other Internet streams. But not any more.
How Elliptic-Curve Cryptography WorksOrganizations like NIST and NSA in the U.S. provide guidance, and that guidance has to evolve. Elliptic-curve cryptography or ECC has been recommended since the late 1990s. But adversaries have access to growing computing power. Cheap cloud computers, GPU arrays, cheap cloud-based GPU arrays, and so on. Recommendations will announce that you should move to a group or modulus of a certain size, which is how a mathematician would refer to the ECC key length.
Back in the late-YubiKey-4-Wired-giveaway days, NSA Suite B Cryptography was being replaced with CNSA or the Commercial National Security Algorithm Suite. By the time I returned to this in 2023, NSA seemed to have removed all mention of CNSA from their web site. Their public discussion of asymmetric cryptography was limited to quantum-safe or post-quantum cryptography algorithms.
SafeCurves project and selecting safe curvesYubiKey 4 could do elliptic-curve cryptography with the NIST P-256 or secp256r1 curve and its 256-bit prime field 𝔽p. However, it didn't support the NIST secp384r1 curve specified by CNSA and approved at the time to protect up to Top Secret, let alone the stronger secp521r1.
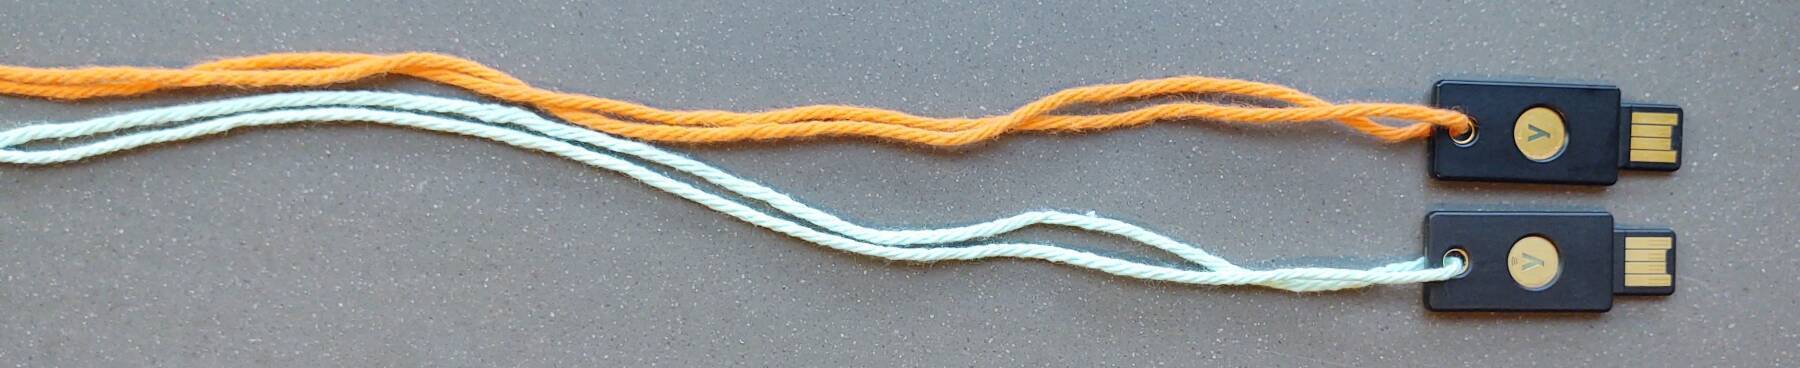
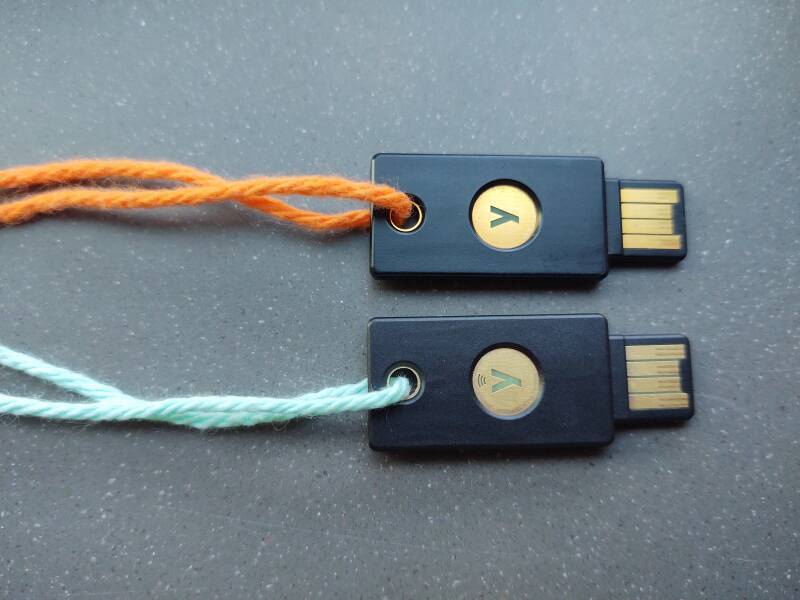
So, they bought a YubiKey 5 and sent it to me. These devices aren't clearly labeled. As you can see above, the only clue that one is newer is that its serial number is almost 24,000,000 while the older one's is just over 9,000,000. Below, the newer one has a small NFC or Near-Field Communication logo on its brass-like touch button.
I had decided when I got the first one that its small size would make it dangerously easy to lose. So, I had made a lanyard of bright orange yarn. For the new one, I used light green. Now I should be able to find them and tell them apart!
The colored yarn helps me to keep track of where they are. I can use the ykman command, part of the yubikey-manager package, to figure out which is which. The YubiKey 4 appears this way:
$ ykman list
YubiKey 4 [OTP+FIDO+CCID] Serial: 9140275

$ ykman info
Device type: YubiKey 4
Serial number: 9140275
Firmware version: 4.3.7
Enabled USB interfaces: OTP+FIDO+CCID

Applications
OTP     	Enabled
FIDO U2F	Enabled
OpenPGP 	Enabled
PIV     	Enabled
OATH    	Enabled
FIDO2   	Not available
[root@rhel8 ~]# exit
The YubiKey 5 instead produces:
$ ykman list
YubiKey 5 NFC [OTP+FIDO+CCID] Serial: 23981622

$ ykman info
Device type: YubiKey 5 NFC
Serial number: 23981622
Firmware version: 5.4.3
Form factor: Keychain (USB-A)
Enabled USB interfaces: OTP+FIDO+CCID
NFC interface is enabled.

Applications	USB    	NFC
OTP     	Enabled	Enabled
FIDO U2F	Enabled	Enabled
OpenPGP 	Enabled	Enabled
PIV     	Enabled	Enabled
OATH    	Enabled	Enabled
FIDO2   	Enabled	Enabled
Configuring the YubiKey Device
Configure a YubiKey for use with pam_yubico.so
with the ykpersonalize command.
This sets up the device,
you can run this command on any system on which you have
installed the ykpersonalize package from EPEL.
You only have to do this once per device.
You are modifying how the device works.
The pam_yubico.so method of authentication
stores nothing specific to the user in the device.
So, anyone can do this for themself or on behalf of others.
$ ykpersonalize -2 -ochal-resp -ochal-hmac \
		-ohmac-lt64 -oserial-api-visible
Firmware version 5.4.3 Touch level 1287 Program sequence 3

Configuration data to be written to key configuration 2:

fixed: m:
uid: n/a
key: h:05d746695f330acd7449d9dad9f78a268c4931f1
acc_code: h:000000000000
OATH IMF: h:0
ticket_flags: CHAL_RESP
config_flags: CHAL_HMAC|HMAC_LT64
extended_flags: SERIAL_API_VISIBLE

Commit? (y/n) [n]: y
Red Hat's documentation is rather haphazard for a free operating system bundled with support for which you have to pay up to US$ 2,499 per server, per year, or up to US$ 3,999 with 24x7 support. But let me introduce you to Yubico's even sketchier documentation.
Their on-line
manual page for ykpersonalize
claims that the full details are in a reference manual.
Clicking that link, which points to a PDF document from
early 2015, leads to a "Document Not Found" error page.
The current ykpers package contains a similarly
old and partial manual page with a reference to
that old PDF file at the non-functional URL.
So, the following is what Yubico's 2015 vintage incomplete documentation says about the syntax. It's clearly incomplete, so while I know that what I have on this page works, I don't know exactly how all the pieces are working, or what alternatives may exist.
-2 —
A YubiKey can operate in multiple modes,
depending on how the software talks to it.
Some of these modes have multiple slots or
multiple configurations,
with the documentation using those terms in differing ways.
So, we use slot 2 for what we're setting up.
-ochal-resp —
Use challenge-response in the way the
pam_yubico.so PAM module expects.
Yes, there is a
-ochal-yubico
"Yubico OTP challenge-response mode",
but that seems to not be what we need.
-ochal-hmac —
Do HMAC-SHA1 challenge response.
SHA-1!
Is there an alternative based on SHA-2-256?
Not that I know of without reading through the
source code for pam_yubico.so
and ykpersonalize.
-ohmac-lt64
Allow the challenge to be less than 64 bytes in length.
As we will see, the challenge is stored as 167 hex characters
or 83.5 bytes, so it's unclear just what is really going on.
-oserial-api-visible —
Allow the serial number to be read using an API call.
Preparing a User
The user can do this for themself with the
ykpamcfg command,
which is in the pam_yubico package from EPEL.
The -2 option tells it to use slot #2.
$ mkdir ~/.yubico
$ ykpamcfg -2
You have to create the directory manually.
The command puts a file named
challenge-NNNNNNNN
into that directory, with NNNNNNNN
replaced by the device serial number.
Don't rename that file.
The authentication process will read the serial number
from the device and then look for a file specific for it.
There doesn't seem to be any functional requirement for that authentication data to be read-only by the user, but make sure that UNIX permissions are conservative and SELinux labeling is correct:
$ chmod -R -c go-rwx ~/.yubico
$ restorecon -R -v ~/.yubico
What Just Happened?
The
pam_pkcs11.so
module, however, does use
user-specific certificates stored within the devices.
But then that's the nature of PKCS #11.
We haven't configured the YubiKey device for the user.
Instead, we have configured the user to link them
to a specific device.
I realize that that is a fussy distinction,
but do realize that neither the operating system
nor the YubiKey device have any information about the
specific user's use of the device.
Instead, the user's home directory contains information
about which device is theirs
(the serial number in the
challenge-NNNNNNNN file name)
and how to verify that it's their device plugged in
(the content of that file).
Let's look at that file. It contains one very lone line, delimited by colons:
$ cat ~/.yubico/challenge-*
v2:9e0410bc2718dadcc75642bfe0bee7dbe224ccc103806cc2c30185c23475af0bc8bc40f9b6aba96478b3926527e16cd21cb27288534bca266f897da28baa58:580255a5791e3bda9eaace43c6104e424eb27374:f95c9d5a83726ff7470f8b30c60e9072f81b6ec7a48d0692f806804a807ce325:10000:2
The first field is
v2
which doesn't seem to correspond to
the model number of the YubiKey,
or the version of its firmware,
or the fact that we're using the second configuration
stored within the YubiKey,
or the version of the pam_yubico package.
The second field is the next challenge, a 167-character hexadecimal string. The third field is the salt, a 64-character hexadecimal string. Both of those values, representing 83.5 and 32 bytes respectively, change with each authentication event.
The fourth field is 10000,
specifying the number of hashing rounds.
The last field is 2,
indicating that we're using configuration (or slot) #2
in the YubiKey.
Beware:
If you run ykpamcfg
on behalf of the user while logged in as root,
it will place the file in
/root/.yubico/challenge-NNNNNNNN.
You will have to move that to the user's ~/.yubico
and change the file's owner and group.
If you are adding a new user after fully hardening the system, including requiring YubiKey MFA, you will have to create users' YubiKey files for them while very carefully dealing with this issue.
Let's Authenticate!
Start with an easy test.
On a freshly installed system,
/etc/pam.d/system-auth
is probably a symbolic link pointing to the file
/etc/authselect/system-auth
and that contains something similar to the following.
This example is from Oracle Enterprise Linux 9:
#%PAM-1.0
# This file is auto-generated.
# User changes will be destroyed the next time authselect is run.
auth      required      pam_env.so
auth      sufficient    pam_unix.so try_first_pass nullok
auth      required      pam_deny.so

account   required      pam_unix.so

password  requisite     pam_pwquality.so try_first_pass local_users_only retry=3 authtok_type=
password  sufficient    pam_unix.so try_first_pass use_authtok nullok sha512 shadow
password  required      pam_deny.so

session   optional      pam_keyinit.so revoke
session   required      pam_limits.so
-session  optional      pam_systemd.so
session   [success=1 default=ignore] pam_succeed_if.so service in crond quiet use_uid
session   required      pam_unix.so
You could insert one line,
bold and highlighted in yellow below,
saying that the presence of the user's YubiKey is
sufficient.
If it's there, that's good enough.
And if it isn't there, the classic UNIX password method
would also be sufficient.
So, this is "either-or" logic,
you just need one of the YubiKey or the password to get in.
You will notice that the pam_yubico.so
line includes the debug option.
Do not try to start using pam_yubico.so
without this option, test and make sure you understand
its operation before removing that.
#%PAM-1.0
# This file is auto-generated.
# User changes will be destroyed the next time authselect is run.
auth      required      pam_env.so
auth      sufficient    pam_yubico.so debug
auth      sufficient    pam_unix.so try_first_pass nullok
auth      required      pam_deny.so

account   required      pam_unix.so

password  requisite     pam_pwquality.so try_first_pass local_users_only retry=3 authtok_type=
password  sufficient    pam_unix.so try_first_pass use_authtok nullok sha512 shadow
password  required      pam_deny.so

session   optional      pam_keyinit.so revoke
session   required      pam_limits.so
-session  optional      pam_systemd.so
session   [success=1 default=ignore] pam_succeed_if.so service in crond quiet use_uid
session   required      pam_unix.so
This is a good experiment for you to do. However, we have actually made security worse because we made authentication easier. Now there are two equally valid ways to authenticate, either of them lets you in. We need to tighten things down.
Multi-factor authentication means all of them. In this case, both the YubiKey and the password. And, if you're setting up true MFA, you very likely need to also support automatically locking the user out after three failed attempts, enforcing password quality, and so on. That's certainly the case with the STIG requirements.
Here is a version of system-auth
that satisfies the STIG requirements.
auth      required                                     pam_env.so
auth      required                                     pam_faildelay.so delay=2000000
auth      required                                     pam_faillock.so preauth silent
auth      [default=1 ignore=ignore success=ok]         pam_usertype.so isregular
auth      [default=2 ignore=ignore success=ok]         pam_localuser.so
auth      [success=done authinfo_unavail=ignore user_unknown=ignore ignore=ignore default=die] pam_sss.so try_cert_auth
# If the service is in this list, skip the pam_yubico.so rule.
# vlock is required by the STIG, it locks idle terminal or console logins.
auth      [success=1 default=ignore] pam_succeed_if.so service in ssh:vlock:remote quiet use_uid
auth      [default=2 ignore=ignore success=ok]         pam_yubico.so mode=challenge-response debug
auth      [default=1 ignore=ignore success=ok]         pam_unix.so
# If both pam_yubico.so and pam_unix.so succeeded, it reaches the next
# module and succeeds.  But if either failed, the entire stack will be
# doomed to failure after reaching pam_faillock.so and recording another
# authentication failure.  Meanwhile, /etc/security/faillock.conf will
# have be reconfigured to lock all accounts, even root's, after three
# consecutive authentication failures, with no automated unlocking.
auth      sufficient                                   pam_permit.so
auth      [default=1 ignore=ignore success=ok]         pam_usertype.so isregular
auth      sufficient                                   pam_sss.so forward_pass
auth      required                                     pam_faillock.so authfail
auth      required                                     pam_deny.so

account   required                                     pam_faillock.so
account   required                                     pam_unix.so
account   sufficient                                   pam_localuser.so
account   sufficient                                   pam_usertype.so issystem
account   [default=bad success=ok user_unknown=ignore] pam_sss.so
account   required                                     pam_permit.so

password  requisite                                    pam_pwquality.so local_users_only
password  requisite    pam_pwhistory.so remember=10
password  sufficient                                   pam_unix.so yescrypt shadow  use_authtok sha512
password  sufficient                                   pam_sss.so use_authtok
password  required                                     pam_deny.so

session   optional                                     pam_keyinit.so revoke
session   required                                     pam_limits.so
-session  optional                                     pam_systemd.so
session   [success=1 default=ignore]                   pam_succeed_if.so service in crond quiet use_uid
session   required                                     pam_unix.so
session   optional                                     pam_sss.so
Oh No, I'm Locked Out!
It is very easy to completely lock yourself out
of the system with the
faillock restrictions.
If you are still root
or can log in as root
in another terminal:
# faillock
[... see the tally of user authentication failures, select the locked user ...]
# faillock --reset --user someuser

[... or, to unlock everyone ...]
# faillock --reset
If you have locked out root then you hope
that you have at least one user who can log in and
run either su to become root,
or sudo to run a command as root:
$ sudo faillock --reset
Complex requirements like the STIG require that all
users be mapped to some non-default SELinux user
such as user_u.
Only those in classic UNIX group wheel
and mapped to SELinux user
sysadm_u can run both sudo
and su.
Those instead mapped to SELinux staff_u
can use sudo only.
But wait, it's worse!
The sudo command has several peculiarities.
One is that while you're given three opportunities to
correctly enter your password,
those count as three complete authentication events.
You can observe this when you try to run
sudo when YubiKey authentication is required
and pam_yubico.so is in debug mode, as shown
above, but you don't have the correct YubiKey inserted.
You see it look for the YubiKey and fail, then ask you for your password. Even if you enter that correctly, you will see "Failure" because the combination of YubiKey plus password failed. It then starts over with a second check for the device then a request for the password. Even if you try the password a second time, realize what's happening, and frantically pound Control-C at that point, that account is doomed because it has already failed three authentication events because of the lack of YubiKey.
The
pam_pkcs11.so
module asks you for the YubiKey PIN.
The
pam_u2f.so
module asks you to touch the YubiKey button on the command line,
and blinks that button in case you are authenticating to
gdm or another graphical application.
The pam_yubico.so module, however,
says nothing at all.
Yes, I agree that it is a simpler and cleaner interface for the user. And it certainly is more secure, if you are focused on keeping intruders out and aren't overly concerned about the risk of self-inflicted denial of service.
Another issue is that running su will now
require the YubiKey device
belonging to the target user identity,
and failure increases that
user's faillock count.
Using su with no parameter as you usually do
to become root,
that means root's YubiKey.
Or, if you intend to run su pat
to become another user, that other user's YubiKey.
The risk is that any
user can run su three times in a row
and disable your root account.
And then the same for all of your
system administrators' accounts.
When you get completely locked out
of your system:
Boot from installation media but select "Rescue"
at the initial screen.
RHEL media can rescue an Oracle system, and vice-versa.
Proceed through the few steps of getting into a rescue
environment, including mounting the file systems.
Look at the very last screen of information,
above where you started a shell.
Do what it says to get into a chroot
environment and run faillock there.
Troubleshooting pam_yubico.so Authentication
If you are doing this as part of STIG or similar compliance,
be careful to make sure that the usbguard daemon
is not preventing access to your YubiKey.
When usbguard is running and you connect
your YubiKey, you will see that it is forbidden when first
connected, and then it should soon be allowed.
On the console,
or in /var/log/messages,
or in dmesg output you should see something
along these lines:
[  106.782465] usb 1-1: new full-speed USB device number 7 using xhci_hcd
[  107.124557] usb 1-1: New USB device found, idVendor=1050, idProduct=0407, bcdDevice= 5.43
[  107.125094] usb 1-1: New USB device strings: Mfr=1, Product=2, SerialNumber=0
[  102.125557] usb 1-1: Product: YubiKey OTP+FIDO+CCID
[  107.126228] usb 1-1: Manufacturer: Yubico
[  107.127174] usb 1-1: Device is not authorized for usage
[  107.137477] input: Yubico YubiKey OTP+FIDO+CCID as /devices/pci0000:00/0000:00:0c.0/usb1/1-1/1-1:1.0/0003:1050:0407.0013/input/input20
[  107.192158] hid-generic 0003:1050:0407.0013: input,hidraw0: USB HID v1.10 Keyboard [Yubico YubiKey OTP+FIDO+CCID] on usb-0000:00:0c.0-1/input0
[  107.196871] hid-generic 0003:1050:0407.0013: hiddev96,hidraw1:: USB HID v1.10 Keyboard [Yubico YubiKey OTP+FIDO+CCID] on usb-0000:00:0c.0-1/input0
[  107.198173] usb 1-1: authorized to connect
Verify that the device serial number as reported by
ykman info
agrees with the filename in
~username/.yubico.
Verify that the problem isn't being caused by SELinux. See my page on building custom SELinux policy modules for how to diagnose and fix this specific problem.
Verify that the user is not locked out:
# faillock
[... several lines of output ...]
# faillock --reset --user username
Observe what happens during an authentication by running
this in one terminal as root
while you attempt authentication in another window:
# tail -f /var/log/secure
You hope to see something like the following, where especially good news is highlighted in bold with light green background:
[someuser@host ~]$ sudo -k ; sudo id
debug: pam_yubico.c:838 (parse_cfg): called.
debug: pam_yubico.c:839 (parse_cfg): flags 32768 argc 2
debug: pam_yubico.c:841 (parse_cfg): argv[0]=mode=challenge-response
debug: pam_yubico.c:841 (parse_cfg): argv[1]=debug
debug: pam_yubico.c:842 (parse_cfg): id=0
debug: pam_yubico.c:843 (parse_cfg): key=(null)
debug: pam_yubico.c:844 (parse_cfg): debug=1
debug: pam_yubico.c:845 (parse_cfg): debug_file=1
debug: pam_yubico.c:846 (parse_cfg): alwaysok=0
debug: pam_yubico.c:847 (parse_cfg): verbose_otp=0
debug: pam_yubico.c:848 (parse_cfg): try_first_pass=0
debug: pam_yubico.c:849 (parse_cfg): use_first_pass=0
debug: pam_yubico.c:850 (parse_cfg): nullok=0
debug: pam_yubico.c:851 (parse_cfg): authfile=(null)
debug: pam_yubico.c:852 (parse_cfg): ldapserver=(null)
debug: pam_yubico.c:853 (parse_cfg): ldap_uri=(null)
debug: pam_yubico.c:854 (parse_cfg): ldap_bind_user=(null)
debug: pam_yubico.c:855 (parse_cfg): ldap_bind_password=(null)
debug: pam_yubico.c:856 (parse_cfg): ldap_filter=(null)
debug: pam_yubico.c:857 (parse_cfg): ldap_cacertfile=(null)
debug: pam_yubico.c:858 (parse_cfg): ldapdn=(null)
debug: pam_yubico.c:859 (parse_cfg): user_attr=(null)
debug: pam_yubico.c:860 (parse_cfg): yubi_attr=(null)
debug: pam_yubico.c:861 (parse_cfg): yubi_attr_prefix=(null)
debug: pam_yubico.c:862 (parse_cfg): url=(null)
debug: pam_yubico.c:863 (parse_cfg): urllist=(null)
debug: pam_yubico.c:864 (parse_cfg): capath=(null)
debug: pam_yubico.c:865 (parse_cfg): cainfo=(null)
debug: pam_yubico.c:866 (parse_cfg): proxy=(null)
debug: pam_yubico.c:867 (parse_cfg): token_id_length=12
debug: pam_yubico.c:868 (parse_cfg): mode=chresp
debug: pam_yubico.c:869 (parse_cfg): chalresp_path=(null)
debug: pam_yubico.c:899 (pam_sm_authenticate): pam_yubico version: 2.26
debug: pam_yubico.c:914 (pam_sm_authenticate): get user returned: someuser
debug: pam_yubico.c:490 (do_challenge_response): Checking for user challenge files
debug: pam_yubico.c:493 (do_challenge_response): Challenge files found
debug: util.c:222 (check_firmware_version): YubiKey Firmware version: 5.4.3

debug: pam_yubico.c:528 (do_challenge_response): Loading challenge from file /home/someuser/.yubico/challenge-23981622
debug: util.c:437 (load_chalresp_state): Challenge: 910944c6c3acbd6cd106a23dc6f0b399e286db8065fcf1c90a7aaba2f9c9d6cf711f0f6533b039a6ebbc8e08b6a273a777cd5e4db4da78435eaee35617d522, hashed response: 27297bb011c268e8d419dec0f598f0968d8c7850, salt: 78c2539f821381c6990753e3f1010c853d7bc369441278ca976cda64167a504d, iterations: 10000, slot: 2
debug: pam_yubico.c:604 (do_challenge_response): Got the expected response, generating new challenge (63 bytes).
debug: pam_yubico.c:690 (do_challenge_response): Challenge-response success!
debug: pam_yubico.c:1220 (pam_sm_authenticate): done. [Success]
[sudo] password for someuser:
uid=0(root) gid=0(root) groups=0(root) context=sysadm_u:sysadm_r:sysadm_t:s0
[someuser@yubi ~]$ exit
If the problem is that the user has not yet been
configured to use pam_yubico.so,
or possibly you tried but misnamed the challenge file,
you will see something like the following.
Lines highlighted in bold with light red background
are the grimly diagnostic ones:
[someuser@host ~]$ sudo -k ; sudo id
debug: pam_yubico.c:838 (parse_cfg): called.
debug: pam_yubico.c:839 (parse_cfg): flags 32768 argc 2
debug: pam_yubico.c:841 (parse_cfg): argv[0]=mode=challenge-response
debug: pam_yubico.c:841 (parse_cfg): argv[1]=debug
debug: pam_yubico.c:842 (parse_cfg): id=0
debug: pam_yubico.c:843 (parse_cfg): key=(null)
debug: pam_yubico.c:844 (parse_cfg): debug=1
debug: pam_yubico.c:845 (parse_cfg): debug_file=1
debug: pam_yubico.c:846 (parse_cfg): alwaysok=0
debug: pam_yubico.c:847 (parse_cfg): verbose_otp=0
debug: pam_yubico.c:848 (parse_cfg): try_first_pass=0
debug: pam_yubico.c:849 (parse_cfg): use_first_pass=0
debug: pam_yubico.c:850 (parse_cfg): nullok=0
debug: pam_yubico.c:851 (parse_cfg): authfile=(null)
debug: pam_yubico.c:852 (parse_cfg): ldapserver=(null)
debug: pam_yubico.c:853 (parse_cfg): ldap_uri=(null)
debug: pam_yubico.c:854 (parse_cfg): ldap_bind_user=(null)
debug: pam_yubico.c:855 (parse_cfg): ldap_bind_password=(null)
debug: pam_yubico.c:856 (parse_cfg): ldap_filter=(null)
debug: pam_yubico.c:857 (parse_cfg): ldap_cacertfile=(null)
debug: pam_yubico.c:858 (parse_cfg): ldapdn=(null)
debug: pam_yubico.c:859 (parse_cfg): user_attr=(null)
debug: pam_yubico.c:860 (parse_cfg): yubi_attr=(null)
debug: pam_yubico.c:861 (parse_cfg): yubi_attr_prefix=(null)
debug: pam_yubico.c:862 (parse_cfg): url=(null)
debug: pam_yubico.c:863 (parse_cfg): urllist=(null)
debug: pam_yubico.c:864 (parse_cfg): capath=(null)
debug: pam_yubico.c:865 (parse_cfg): cainfo=(null)
debug: pam_yubico.c:866 (parse_cfg): proxy=(null)
debug: pam_yubico.c:867 (parse_cfg): token_id_length=12
debug: pam_yubico.c:868 (parse_cfg): mode=chresp
debug: pam_yubico.c:869 (parse_cfg): chalresp_path=(null)
debug: pam_yubico.c:899 (pam_sm_authenticate): pam_yubico version: 2.26
debug: pam_yubico.c:914 (pam_sm_authenticate): get user returned: someuser
debug: pam_yubico.c:490 (do_challenge_response): Checking for user challenge files
debug: pam_yubico.c:496 (do_challenge_response): No challenge files found
debug: pam_yubico.c:718 (do_challenge_response): Challenge response failed: No such file or directory
debug: pam_yubico.c:1220 (pam_sm_authenticate): done. [User not known to the underlying authentication module]
[sudo] password for someuser:
[... At this point someuser has already suffered one
     authentication failure, and will have another
     tallied with each password attempt. ...]
Finally, if the user is ready to use YubiKey but no YubiKey is present, you will see something like this:
[someuser@host ~]$ sudo -k ; sudo id
debug: pam_yubico.c:838 (parse_cfg): called.
debug: pam_yubico.c:839 (parse_cfg): flags 32768 argc 2
debug: pam_yubico.c:841 (parse_cfg): argv[0]=mode=challenge-response
debug: pam_yubico.c:841 (parse_cfg): argv[1]=debug
debug: pam_yubico.c:842 (parse_cfg): id=0
debug: pam_yubico.c:843 (parse_cfg): key=(null)
debug: pam_yubico.c:844 (parse_cfg): debug=1
debug: pam_yubico.c:845 (parse_cfg): debug_file=1
debug: pam_yubico.c:846 (parse_cfg): alwaysok=0
debug: pam_yubico.c:847 (parse_cfg): verbose_otp=0
debug: pam_yubico.c:848 (parse_cfg): try_first_pass=0
debug: pam_yubico.c:849 (parse_cfg): use_first_pass=0
debug: pam_yubico.c:850 (parse_cfg): nullok=0
debug: pam_yubico.c:851 (parse_cfg): authfile=(null)
debug: pam_yubico.c:852 (parse_cfg): ldapserver=(null)
debug: pam_yubico.c:853 (parse_cfg): ldap_uri=(null)
debug: pam_yubico.c:854 (parse_cfg): ldap_bind_user=(null)
debug: pam_yubico.c:855 (parse_cfg): ldap_bind_password=(null)
debug: pam_yubico.c:856 (parse_cfg): ldap_filter=(null)
debug: pam_yubico.c:857 (parse_cfg): ldap_cacertfile=(null)
debug: pam_yubico.c:858 (parse_cfg): ldapdn=(null)
debug: pam_yubico.c:859 (parse_cfg): user_attr=(null)
debug: pam_yubico.c:860 (parse_cfg): yubi_attr=(null)
debug: pam_yubico.c:861 (parse_cfg): yubi_attr_prefix=(null)
debug: pam_yubico.c:862 (parse_cfg): url=(null)
debug: pam_yubico.c:863 (parse_cfg): urllist=(null)
debug: pam_yubico.c:864 (parse_cfg): capath=(null)
debug: pam_yubico.c:865 (parse_cfg): cainfo=(null)
debug: pam_yubico.c:866 (parse_cfg): proxy=(null)
debug: pam_yubico.c:867 (parse_cfg): token_id_length=12
debug: pam_yubico.c:868 (parse_cfg): mode=chresp
debug: pam_yubico.c:869 (parse_cfg): chalresp_path=(null)
debug: pam_yubico.c:899 (pam_sm_authenticate): pam_yubico version: 2.26
debug: pam_yubico.c:914 (pam_sm_authenticate): get user returned: someuser
debug: pam_yubico.c:490 (do_challenge_response): Checking for user challenge files
debug: pam_yubico.c:493 (do_challenge_response): Challenge files found
debug: pam_yubico.c:514 (do_challenge_response): Failed initializing YubiKey
debug: pam_yubico.c:709 (do_challenge_response): Yubikey core error: no yubikey present
debug: pam_yubico.c:718 (do_challenge_response): Challenge response failed: Resource temporarily unavailable
debug: pam_yubico.c:1220 (pam_sm_authenticate): done. [Authentication failure]
[sudo] password for someuser:
[... Again, someuser has already suffered one
     authentication failure, and will have another
     tallied with each password attempt. ...]
I swear that it's light green! There was strange lighting at the coffee shop or something...